Pages

Friday, September 23, 2011

Canning for the fist time

      
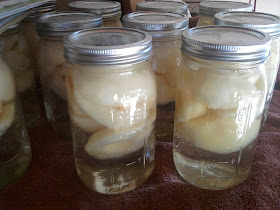
           On top of Sewing like mad these past few days and weeks, I have also been trying to can for the first time! When stuff gets ripe, you have no choice but to get the work done then! :) Phew! Too bad I don't get a paycheck for working this hard! I think in all honesty, I work harder being a stay at home mom than I ever did working full time getting paid. There is so much wasted time at work. I used to think, "I can't believe I'm here, I could be getting this, and this and this done at home." I feel pretty fulfilled at home sometimes!

Apple sauce is next! Yay!
          Canning makes me think of the pioneer women for some reason. I'm pretty grateful for Tiffany who helps me with stuff like this! I can't imagine being a woman back in the wagon days trying to take care of baking each day and cooking and killing chickens, collecting eggs, making candles, tending children, doing laundry, cleaning and canning on top of it all. I bet they did it all alone too because their farms were so far apart and husbands were out with the livestock or plough. I'm pretty happy to live in this day and age sometimes, but sometimes I wouldn't mind no tv and the NEED for internet and phones.

Wrap Shirt


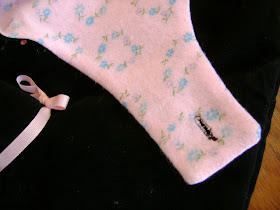
I love this pattern!!! I will make it time and time again. I can't wait to try new fabrics and try different combinations. I wanted a simple cute halloween/October shirt. The instructions were easy to follow and I love the way it came together. I really like the way the hem is done and the finishing work. Nothing complicated and it makes for clean lines. LOVE IT!!! The pattern has you put the ties on the other side, but because of shortage of bias tape, I had to improvise on the last inch of the top and I didn't want it to show. I hid it on the inside of the shirt. I also made my own ribbon for the outside because, again, I ran out. I like that most the time I can improvise. :) I do most of my sewing late at night and running to the store is out of the question. I have so many scraps anyway, that it's nice to use them up for things. :)


Thursday, September 22, 2011

Wrap Skirt

I like how simple this skirt is to make. I would probably use a different fabric next time, something without nap or direction. also, I didn't have any bias tape, so I just used fabric I had that went with it to make my own. The fabric was not cotton, so it doesn't lay down very nice. This is not due to the pattern in any way, just my resources. It was a little confusing for me to figure out how it goes on a person because I don't have anyone this size here at my house. It is for my niece. This pattern would be easy to make a lining for too if you wanted it thicker or not see through. I like that you don't need to hem things because I hate hemming. all in all it was an easy skirt! I like it a lot! I only wish It came in my size! :) I also did something with the skirt as far as sizing. My niece is skinny like my daughter so I made a 5/6 in the waist and a 7/8 in length. I hope it works out! now, for a top!

Boys Ties

The sewing pattern used for these ties is found here: http://www.etsy.com/listing/58677128/boys-tie-pattern-ebook-teen-baby-sizes  I just loved this pattern, I bought the dad's tie pattern too! :) This is the best shop ever! http://www.etsy.com/shop/Patchworkids?ref=seller_info  I love her patterns! These ties are just like the real ties you buy in the store only easier, cheaper, and with cooler fabrics! I don't know how they will wear because I'm not a boy and these are for my nephews. They are cotton, so they will probably wrinkle but that's ok, they are awesome! :) the best part is, they turned out great even though I didn't "measure" and get the pattern precisely on the fabric. I just sorta guessed, because, I was a little lazy. :) ANYONE will love this pattern! You don't even have to be a pro to sew them! look at mine! :)
I have made these ties with fabric I got at garage sales or left over from sewing projects or from grandma. You only need 3/4 yard for the size 10 tie. You may need less too. I used a different fabric for the back because I didn't have enough for the front. But don't most ties use different fabric for the back?

Kitty Costume

            I wanted to make this for a long time and finally decided to do it!  I know i'm like a month early planning for Halloween, but that's just how I am.

I got this pattern from:  http://www.etsy.com/listing/81879609/diy-make-your-own-longalls-or-shortalls or http://www.etsy.com/shop/babykaysboutique?ref=seller_info. This pattern is so cute! I love it and it wears so comfortable and easy. Sewing these overalls was a lot faster than I thought as well. I will make these again for sure! Please ignore all the lint stuck to these in the pictures. My daughter doesn't want to take them off for a second and they are made out of velveteen. I chose this fabric because I got it in a huge box of fabric I purchsed at a garage sale for two bucks. There is a big roll of it in the box so I better use it! :)
   I added a tail to the back and wrote meow in fabric paint. I kind of regret the fabric paint idea, only because I'm not sure it even looks good. the bow was added above the tail so the letters wouldn't look so weird. sigh. It's just a halloween costume! :) right?

    This pattern calls for a lining, so I used fleece to keep her warm, and it's also stuff I had on hand. THANK YOU GRANDMA! My button holes are far from perfect, but they work!

  This is a collar I made her with ribbon and glued crystals and pearls on it. the ends are closed together using a hook and eye. my camera doesn't show this well, but the whole outfit uses pink and black.

Don't you just love her crazy hair?! first thing this morning she wanted it on!

Wednesday, September 21, 2011

Kitty Ears for Halloween

   My daughter has a love for kitties lately, so for Halloween, I made her a kitty costume! My camera died tonight and is charging, so I'll have pictures of the rest of it tomorrow. Meow!!!
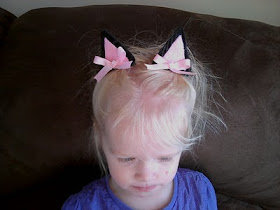
        These are far from exactly centered, but I don't care, I think they turned out perfect! I took four pieces of black fabric and lined them with interfacing and cut into triangles. I then made smaller pink triangles and ironed them onto the front two pieces, then stitched down. I sewed the front and backs together with right sides facing then turned inside out. I then top stitched around the outside, leaving bottom open. I hot glued a piece over the top of the barrette then hot glued the ears on turning under 1/8 inch all around. I then glued bows on and some crystals.

Friday, September 16, 2011

Simple, Quick Valance


     When I painted my daughter's room a while ago, I planned on sewing a valance too. It kept getting put off and honestly, I had never sewn one before so I was unsure what to do. I bought 2 yards of fabric and found a valance I had on her window before that was purchased. I added about 3 inches in length and 5 inches in width to make it fit a little better. on the two short ends of the fabric I folded in about 1/2 inch and folded it again then stitched  in place. I then folded the fabric in half with right sides together and stitched along the top raw edges. Then I turned it right side out and stitched close to the top edge just to keep it in place. I top stitched again at 1 1/2 inches from top, then again about that far from the last stitching. Simple as that! no bottom hem needed which I love! :)


Christmas Cookie Countdown Calendar

   I made this calendar for my kids to count down the days till christmas with! It was so cute I couldn't resist! I remember the fun one my mom had for us as kids with a mouse that moves from day to day and above was Santa sitting in his house. I loved it and looked forward to moving it each day! This one is a little different. You start out with the cookies in each pocket and each day you take a cookie out and put it in the bowl.
     So cute!
    I purchased this pannel from http://www.etsy.com/shop/cjscraftcorner .  She is a very nice and helpful person and has such cute stuff she makes to sell and often has fabric as well.
         These cookies were fun to make! The instructions say to use paper backed fusible web- iron the fabric to felt. I took it a step further and used fusible interfacing to iron onto the fabric, then fusible web to the felt. I then stitched a decorative stitch around the edges and finally used a lighter to get rid of freyed edges. The freyed edges probably wouldn't be there if it weren't for the interfacing, but I like the extra stability it gave them. I think they turned out perfect!

         I wanted to have this hang on my fridge for now and if later we move or have a place on the wall fo rit, I will sew on some plastic loops to hang on the wall with or something. I glued magnets to the inside layer of fabric before I sewed it together. two problems with this method: 1- the magnets stuck to the table and my machine while I tried to quilt the top and I couldn't stitch over certain parts. 2- they don't stick as well to the fridge. I noticed there was a big gap between magnets because I only used  4 on the corners and it was saggy, so after it was finished, I glued 4 more on the back in between the others. now, it works great.

machine quilting around shapes. I also quilted around each day square on the bottom.


         I decided to do the pillowcase method to sew this together rather than the binding. I like the way it turned out! I also used interfacing behind the bowl piece rather than just a single layer of fabric flopping around, and I also put interfacing behind the whole top. I like the stuff and It makes for a longer lasting, more durable item. I look forward to my kids using this each year!!!

Monday, September 12, 2011

My biggest project ever!

Our Garage Sale Table

After (above) Before (below)
doesn't look a whole lot different, but it is.
             My previous table was one I had in my tiny apartment before we got married and it was falling apart..... REALLY falling apart. If we had guests over and they bumped it with their leg or something, glasses would spill. It even had a tendancy to migrate across the room. :) It was painted and just junk. We needed something bad! By perfect chance, we came across this table and 9 chairs at a garage sale for $25 and picked it up because it's a SCREAMING deal. the top needed work and was an ugly gold color. The chairs didn't match in color to the bottom of the table and you could scrape the previous paint off with your fingernail. It needed tlc but I was encouraged by my friend Tiffany that "we could do it!" My friend and her husband sanded all the chairs, we painted and distressed them and varnished over top. The table was my baby. I stripped the top and sanded it smooth, then worked on the bottom.
 I painted, distressed and varnished that too. (Tiff helped with the distressing because I didn't know what I was doing) The top was a little hard because I've never stained anything before. After some help from my dad, it turned out ok. it's dark, but that's what I was going for. I only put three coats of varnish on and now wish I had done more. Maybe I still will. :)


We reupholstered the chairs with micro suede fabric in tan and dark brown for the 2 end chairs.


          I was worried that my daughter would ruin the micro suede with her juice, greasy fingers, ketchup, and yes, even pee. (not a fun thing to clean up) I decided to make a few chair covers that had plastic backing and could be thrown in the wash. They turned out different than I hoped, but they work. I wanted the ruffles to lay down better on the sides, but other than that, they are great! I HATE doing ruffles, and these seat covers had the LONGEST i've ever done. grrrrr. It took me all day I swear! aside from the being a mom part, potty training, snuggling and getting us fed. :)
ignore the dirty chair! :) I'm going for country style in my kitchen If I ever get it there! I need help! :)


This project was WAAAAAAY bigger than I thought, but It's rewarding to have worked so hard!

Friday, September 9, 2011

Making Pens!

     I just got back from my first vacation ever with my own little family. We went to Friday Harbor, WA to see my parents!!! What an awesome time we had relaxing and enjoying their company. The beauty of the island was just a bonus! Anyway, my dad is a really good wood craftsman, and I wish I had more time with him to learn more from him. Some of my fondest memories as a kid were hanging out in his shop with him talking and watching him work. He has recently discovered pen making with his wood lathe. He was so patient with me and my husband in teaching us how to work it. (It was not as easy as I thought it would be.) I think he has a way of making things look easy. That's what years of practice will do I guess!!!! :)  My pen is the dark one. I wanted it simple and small- my favorite part of it is the swirl on the top that is in the grain of the wood. This is a very hard wood and when it's all waxed up feels like BUTTA!!! I LOVE IT!!! I'm a little afraid to use it though, I might lose it!

THANK YOU DAD!!!

Necklaces

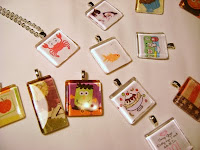
        I wanted to make a fun present for my mom's birthday this year, so I made here these cool tile necklaces in different hollidays. The tiles were super hard to find, I thought. No one around here knew what I was talking about. Hobby lobby told me to get mosiac tiles- those had painted on backs that would not come off with even a paint stripper. I looked on etsy for tiles, they had them but wanted an arm and a leg. I was told by a person on etsy to look here: http://www.sunandmooncraftkits.com/  They have affordable supplies and they ship fast! :) which, after all the trouble I went though, I wasted a lot of time. I think they turned out pretty cute! I got the tutorial here: http://www.simplymodernmom.com/2009/10/glass-pendant-necklaces-tutorial/

I made some for myself and my daugher too. She always wants to wear my necklaces, so I thought this way, she can wear her own. :) She LOVES it!