Pages

Wednesday, January 2, 2013

My Husband's Birthday Cake- Chocolate Chip cookie dough cake

              My husband's birthday is a few days before Christmas and It's always a fun task for me to take my mind off of Christmas and focus on making my man feel special.  I like to try new things on him too. he doesn't ever give me an idea of what he wants... or helps me at all there, so I just wing it and hope for the best.  I saw this.. on my all time favorite spot... PINTEREST!.. and thought it looked perfect for him.  He LOVES Chocolate Chip cookies, we used to always get DQ blizzards with cookie dough when we had one near us, and it didn't look childish or too complicated.
   The blog I found this recipe on is here.  My husband's review.. "it's good... really good, but too sweet for me." I think i'll keep trying to use the cake recipe, but the cookie dough for this is... kinda not what I expected.  it's gooey rather than solid and it's super sweet.  The frosting was the first ever that I made where you had to cook it. it was fun to try something new, but it was still really sweet. I'm not sure i'll give up on the frosting yet.  I think I just need more birthdays to make cakes for. LOL!!! Uh oh... am I already baby hungry? i'm nuts!!!!

Happy Birthday to the best husband I could ever have and the most wonderful father!!! 

He was home with us for almost 2 full weeks and it was AWESOME! I am exhausted though.  I'm not used to having another body around here often and having constant dishes to clean up and laundry like crazy. Now, however, It feels empty and lonely. I find myself at a loss of what to do. It was so busy while he was here I never had a chance to even blog! that's why you see 5 new posts all of a sudden!! :) Oh how I would love to have him home all the time though. ANYONE want to buy a house??? 


More bears

          I was asked by another customer to do some bears for Christmas gifts.  Doing bears is a great joy to me to be able to touch people's lives in such a tender way. The two jeans ones were for sisters and the middle one was for herself to remember their mother by. These were made out of their mom's favorite outfit.


         I ran out of jeans to do 3 bears with it, so I used her t- shirt to do a bear in. I've done another bear in a t-shirt and I never had a problem.  This particular shirt must have had more stretch in it than the other one because it lost it's shape really easily. I told the customer that this bear looks like he gained 30 lbs. :) Still cute and super squishy! :) Her mom loved country stars, so this bear got them. 
Here are the two bears next to each other. Same pattern, sewn the same way, just different fabrics. 


    If anyone is interested in having me make these bears for them, I charge $50.00 a bear. If you want the heart or shape on the chest done, it's $3.00 extra per bear. If you need shipping two and from, that will be up to you to take care of.  I enjoy making these and put my heart and soul into each bear. Each bear takes me approx 2 days to work on them if I have no other plans and if my girls cooperate. :)  Other memory bears I've seen sell for this much on etsy or blogs, but they are super simple bears with out cute faces and ears.. hands and feet. Other bears I've made can be seen HERE. I like to know some history about who the clothes came from and the family member getting them, so I can make it extra personal. One bear can be made from one L or bigger shirt and extras come from other clothing you provide.  Other fabrics work such as: jeans, fleece, sweatshirts, cotton button up shirts, flannel... etc. if you have any questions, please feel free to contact me: sewinsanity@gmail.com I am always happy to talk with you on a project or answer questions you may have. 


               I wanted to try something a little different and do the same bears on a smaller scale. I scanned each pattern piece in the computer and shrunk them.  This is how some turned out. 

                    These were bears for my girls using fabric I had on hand just to try it out.  The bear on the right is soft and made with minkee and cotton.  I would have done the nose in chenille like the other bear though.  the bear on the left is made from minkee and cotton and chenille. I ran out of chenille to do the main body with so I improvised. My girls don't care that they aren't PERFECT, they love them and cuddle them just the same! :) 


           This was a bear I made for my mom for Christmas this year.  It's the smaller size and made with flannel and chenille. (minkee for pads of feet)  it turned out so cute!! :)  This bear is also an example of what the eyes and nose are like without the white dots.  The pattern has you put them on, but I like them either way. 


The discovery I made with the smaller size is that they take just as much time to create! The cutting out part is a LITTLE faster I think, and they obviously use less fabric, but still the same amount of work and time put into them. 


Christmas Stockings

         When we celebrated our first Christmas years ago as a family, I wanted to make us matching stockings.  I used a pattern for them that I bought from JoAnn's and made the smaller size.  If I ever find that pattern again i'd make the bigger one for sure.  They turned out awesome other than nothing much fit in them.    
    Since then, We moved to a different state and I had my sewing things in a few different places.  Once we put my sewing room in the unfinished basement so our baby could have my room, my sewing stuff is super unorganized and I can't find things often... like this pattern.  I also saw one like this online somewhere and wanted to make one. I figured that If we have another baby, I can just make both kids a new stocking and if I don't have enough fabric, i'll just make all new ones.  I hate trying to make decisions on the unknown and always playing it safe.  I decided to do what I wanted and I have no regrets about it. :)


       I started by drawing a pattern on paper of what I thought it should look like, added a 1/4 seam allowance all the way around, and made sure it was the same on both sides.  The rest came together pretty easy.  Now, the only thing I would change about my pattern is the feet.  They turned out more narrow than I anticipated, but still... cute! :) The bum flap on this stocking is a pocket too.  :) 


      Thanks goes out to my awesome aunt who helped me get the letters for the stocking on short notice! She helped me with the first ones.  She has a sizzix that cuts out the font for these and I wanted them to match.  I don't know anyone else with one around here, so she totally saved the day.  It's one more thing on my list I wish I had. :) I would use it so OFTEN!! 


More stockings: 

         My parents mentioned they didn't have stockings they used anymore so I thought i'd whip them up one and they could use them if they wanted to next year.  I tried to find fabric I had that was close to things they are interested in.  The pattern and tutorial I found online for these is AWESOME and works great! you can find it HERE.  For the heel and toe areas, I used heat and bond instead of spray adhesive  I also expanded the hanger loop to 2.5" wide I think. Rather than doing a zig zag stitch around the heel and toe, I did an applique stitch. 
My dad is always in the shop working with wood and loves the outdoors and camping.
He's super hard to find anything for anymore because he has everything he could want at this point in his life and .... he's happy with the smallest things. :) I ended up filling it with snacks and candy he likes.  


My mom likes to ... bake and cook. :) 

Here is a sneak peak of my next post: 
I filled her's with ... a bear! 


My husband's boss loves hunting. His was made with camo and brown minkee. 
                                                                       

         We filled his with a camo mug, Spade L steak seasoning (best ever!), beef jerky, ... what else.. oh, I threw in some more scentsy.. ??? I don't even know if he likes it or not. :)  it seems like there was more. can't remember. 


              I also made a stocking for my brother who is serving overseas right now. It's made out of uniform and red ribbon.  the lining doesn't match exactly, but it's what I had on hand.  Needed to whip this up fast and get it in the mail to him a long with a bunch of cookies.  I have awesome friends that helped me get together 4 boxes worth of cookies for his squadron. 
                    The hanging loop is my favorite part- It's the label on the shirt. 


Our 2012 Christmas Pajamas

I just have to show you... All the pictures I took turned out so silly.  Mainly my oldest was making faces and being squirmy. Needless to say, after 5 min in the car right after these pictures, she crashed.  
They crack me up!!!


If you want info on what patterns I used and where I purchased my fabric or shirts, click HERE

          My husband usually needs extra tall length, but he wasn't home so I grabbed an old pair of pajamas and added an inch more to the length just in case.  I did the waist the same as the other pair... or so I thought. When he put them on Christmas eve, I should have taken a picture.  He hiked them up like Steve Urkle.  It was hilarious !! Obviously knit wears different than flannel.  I should have shortened the waist a lot more than I did and kept the length where It was... and even done a smaller size. Mine were the same way.  I wish I would have done a smaller size and kept the length where it was.  OH WELL!! Lesson learned.  I hate looking back on projects and saying.. I shoulda!! or on life experiences period. all it does is cause regret and upset. so.. MOVING ON!   

        The girls pajamas turned out adorable! If I had a serger they would look so much better and the bottom hem would be the length it should.  I am also still after all these years, learning my machine.  I discovered after doing two pairs of pajamas that I was using the wrong stitch.  it was still some sort of stretch stitch, but it was way thicker of a stitch and used way more thread than the other stitch I found.  (my machine is SUPER old) This is my first knit project so next time, i'll know! I do like knit and I do love this pattern! the only thing I would do differently next time with the pattern is the neck.  I would stitch BOTH shoulders together and stitch the neck binding together and then just attach the neck binding like you do the arms, then top stitch.  that way you don't have an open ugly seam on the inside of the neck. 


Ruffle Aprons


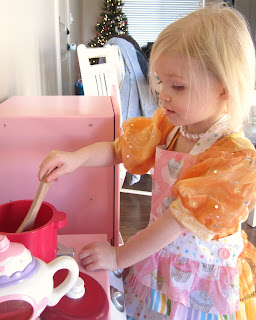
              For Christmas this year, my 3 year old is getting a play kitchen and I know she will love it!! She loves helping me in the kitchen and making "cakes" in her pot and pan set she got for her birthday. I found a tutorial online for one, but it was all in cm measurements and for me a little indirect with the instructions.  I guess I'm just used to sewing patterns that you buy of etsy now with step by step instructions with pictures.  I was also feeling like I wanted to do a full lining on the back and the way I usually sew, I just look at the picture and duplicate it. needless to say, It turned out just fine! :)
          I bought this fabric from xogigifabrics and LOVE the quality and sparkles on the cupcakes. The Fabrics I used were:
cupcakes are cupcakes in pink/ manufacturer: Michael Miller
 Remix Polka Dots in Spring
Remix Stripes in Spring
Robin Egg Solid by Robert Kaufman
Zig Zag In Spring

The whole remix line is designed by Anne Kelle and manufactured by Robert Kaufman.

I used 1 yard of the cupcakes and still have a little left over. 1 yard of the polka dots and 1/2 yard of everything else.  for the back I used an old sheet. 

For the oven mitt I used fusible fleece for the backing of the cupcakes and old sheet on the inside.  I made binding for the opening with the polka dot fabric.  for the pattern I just traced one of her Melissa and Doug ones and added 1/4" to the whole outside. 

For the waist, instead of having ties I would always have to tie and untie, I made her Velcro. the button is just for looks. 

The neck I made long so I could attach more buttons as she grew and it would help her do her buttons. :) 


I even sewed her some felt raviolis using my pinking shears and 2 1/2" squares. I modge podged a label on that I found on Google.  I just searched for ravioli labels or something.  The jar is a plastic one from JoAnns. 

for my apron, I did the same type of thing, but hated how wide the waistband was, so after finishing it, i thought about it for a while and thought if I spent good money on fabric and put all this time into it, I don't want to have something I don't like.  I decided to take it apart.  My good old seam ripper and I!!! I decided to add another layer to the bib part also, and another strap for the neck tie that is adjustable and not just a button. 
AFTER; I like it a lot better now!! :) 

UPDATE:
I have to say that my daughter is NOT  a morning person at all. She takes after me!!! It took her about 2 hours to wake up completely on Christmas morning.