Pages

Wednesday, April 10, 2013

Natalie's Blessing Dress

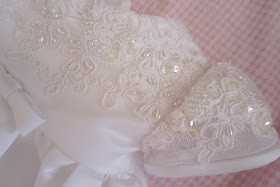
     I need someone to remind me to take a before picture!!!! This is my sister-in-law's wedding dress.  My newest Niece is getting blessed soon and I didn't ever make time before she was born to make her something, so I took this opportunity to make myself useful. :)

        In my earlier post  I used my own wedding dress to make a blessing dress for my daughter, I used the same pattern for this dress. We both agreed that this pattern was just perfect. ( McCall's pattern M4865) My whole idea for this was to make a Mini wedding dress, and I think it's pretty spot on.


   When I started cutting this dress out I was a little nervous about it looking right.  The top of the dress had darts in it and things to fit the bust of a woman, so I had to take the seams apart and sew them back together with smaller seams to make the top lay flat.  HOPEFULLY no one will notice. :) 


   This dress wen't super fast because I used the whole sleeve of the original dress, binding and all and just shrunk it to fit.  It saved a lot of time! That was not even my intention. The bow was on the original dress, so I shrunk it and sewed it in place.  

   The hem was not done by hand on this one.  I started and it was turning out really crooked and I was feeling impatient and had mom duties to attend to. so...I took great care in measuring and pressing the bottom, then machine stitched it. 
   
The back was even fast because I had done it before and it was like muscle memory took over. 


I wanted to make a little headband too, so I used ruffle elastic stretchy stuff, stitched it and then... ruffled some satin and stitched it in a spiral on some interfacing.  I took a beaded applique off of the sleeve fabric left over and hand stitched it on top where the end was and stitching showed.  Then, I sewed a left over button from the back of the dress on top. Then, you just hot glue it on! :) you can glue a piece of felt, fleece or fabric to the back if you want to make it soft for baby's head, but if it isn't super bumpy and stuff, you don't even need it.   it turned out cute!!!! 

Here is a picture of my daughter wearing it. 

Also, if anyone is wondering, I have washed both dresses by hand and in my washing machine (top loader -front loaders beat clothes up more I think) on hand wash cycle. They come out looking totally fine and no damage done.  I then press them with my iron on the silk setting.  perfect!!! 


Sock Monkey Sister Outfits

        I regret that I never remember to take my camera out while they are wearing the outfits at the same time while they are clean and their hair is done.  That only lasts 3 min! I purchased this sock monkey fabric a long time ago and never knew what to do with it.
      I was having one of those days a while ago where you wish you could just rewind to the morning and stay in bed all day rather than have the awful day you had, or fast forward past bedtime and just be done with the day already.  I was trying to sew things for my sister in laws and get them in the mail but nothing I tried was working, I couldn't get the stuff even cut out because I didn't have enough fabric, and the other project I ended up not having the right pattern for it, so after ordering fabric and patterns and spending MORE $ and time, I just got up and walked away.  The next morning I got up and saw my machine still sitting there and all my sewing stuff out and thought it would be awful to have my last sewing experience of the week be bad, so I decided I'd go make the girls something really fast before I put it all away for the weekend and then start fresh on Monday with the need to get done stuff.

I only had a yard of the monkey fabric and scraps of random red. This is what came from it all.
         For the skirt, I just winged a simple skirt and added a band along the bottom with elastic in the top. The shirt was actually a sweater that was mine.  One day I went to wear it and noticed it was falling apart at the seams.  I have had it for years and loved it so it was worn a lot.  I took it all apart and fit it to her. it's not perfect, so don't look too close. I just fumbled through and hoped it would turn out.  No idea what I was doing. 

     The dress is the dress pattern I love by Scientific Seamstress that can be purchased HERE. It is called girls dress pattern, stripwork jumper.  I have yet to try the stripwork version, only done the solid version.  I didn't have enough fabric for a full on ruffle or band along the bottom, so I stitched on some ribbon.  Turned out cute!!! :) This little project turned my day around.  

(This little crazy hair girl let me take a picture of her in it. :) she loves it.  In this picture the skirt is way long, so after this, I shortened the length about 3 inches.  I even had it hiked up just for the picture. )

BDU dress and hat

   My brother serves in the U.S. Air Force and has been stationed in Afghanistan for over 9 months.  He gets to come home in a few weeks so I wanted his kids to have something cute and meaningful for them to wear when they get to see him for the first time again.
     This dress was made in a size 5 (bigger than dresses I'm used to sewing around here, so it seemed super huge! It fit her though!) The pattern I used can be purchased herehttps://www.etsy.com/shop/scientificseamstress  it's called the Carla Strip-work Jumper
Tops and Dresses. It comes in sizes 6 month to 8 years.  I have to say that I LOVE Scientific Seamstress patterns.  I have used multiple ones and each one is perfect! she even sends you a doll size pattern along with it.  This dress I did not do strip-work, I just did the full panel bottom and did not do a ruffle.  I added 2 yards of lace trim to the bottom. I loved not having to hem the bottom that way! :)

      For the knot front, I did the button holes in the same position as the pattern tells you to, but I doubled the strap pattern in length, then placed the pattern piece on a fold. It did come out double the total length that way.  I use this pattern all the time and AGAIN, I love it!!


      The hat was intended for my nephew, however when he got it, it was too small. :( My daughter is in these pictures to show how it fits. I feel bad they live so far away from me (NC) and I had to just ship it and hope it fit. Now my nephew doesn't have anything to wear. sad!!!
   For the hat I used the  Jack N Jill Hat- Sewing Pattern by Izzy and Ivy 
     It is an awesome pattern and I believe it would have fit fine if I wasn't using such thick fabric. It was also my very first hat from this pattern, so perhaps they just run small.  I intend on making more, especially after seeing my daughter in it. so cute!!!

(I have no idea what she is doing in her mouth, but it was a good hat shot)

      When I started this project, I had the intention of using used uniforms, but no matter how I tried to work it, there was not a piece big enough to make the dress.  if it were a smaller dress, I probably could have done it using the shirts. I ended up ordering fabric from here.  I purchased 1 1/4 yards (60 wide) for $6.something and then paid shipping.  it wasn't too bad, and it got here really fast.