Thursday, January 26, 2012

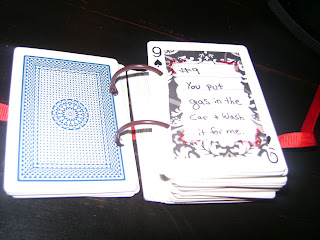
52 Reasons I LOVE You


I found this post on etsy on how to make a valentine gift for someone you love out of a deck of cards


      I am thinking of things I can put in a box and mail to my husband on Valentines day to make him smile because he'll be away at work. I'm not BIG into Valentines day because it's just a money making holiday and doesn't really mean much to me, but I figured it would be fun to do for him.

It turned out to be so thick that I have to tie a ribbon around it to get it to be somewhat flat! :) My cards don't look as good as the tutorial ones, but they'll work.


      The cards I used were just some old ones we HOPEFULLY won't miss. we have a few decks. They are blue and don't go with the colors I picked to do this with, oh well! :) I also made sure to do red glitter glue on each and every page in some way or another to tie it together. I used 4 different styles of papers.


I love my husband so much, I never imagined it would be so hard to find 52 worth while things to write down. It wasn't hard just ... head scratching.

I did a back for mine too. Hope he Likes it!


Friday, January 6, 2012

making a replacement seat for a doll stroller

      We bought a doll stroller from walmart for $10.00 or so for my daughter's birthday in October. in 2 months she managed to rip the fabric on it because she likes to sit in it herself. No surprise it broke! :) We figured it would happen sooner or later and it was only $10.00 so no big! Today, after weeks of her wanting me to fix it, I finally did. :) it took me about an hour start to finish and was pretty simple.
     I used a small piece of scrap for the whole thing that I bought at walmart for cheap months ago.  I lined the front parts of it with fusible fleece to add support in case she still wants to sit in it. :)  I cut the old one apart and traced it onto the new fabric and went from there.  I hated how the bottom of the seat would always come off and she would bring it to me multiple times a day to put it back on for her, so.... I added ties to keep it on this time.
    It's not the best sewing job i've ever done, but it works. I used what I had on hand and hurried up with it. I'm not concerned with tiny cosmetics on this one.


                                                         This makes for a happy girl again!

Diaper Bag for Mary


               My best friend is having a baby in a matter of weeks!  months and months ago, I promised I'd sew her a diaper bag, so as usual, I crammed a week of sewing time into a day and a half.  This pattern I used looks cute on the outside, but if I ever use it again, i'd change A LOT about it. http://www.etsy.com/listing/64227052/ultimate-diaper-bag-pattern-tutorial
First of all, the instructions are very spotty. There was a lot not spelled out that you are left to figure out on your own. I was annoyed with that because it took me longer to do, but other than that I had no problem figuring it out. The straps were super thick to sew through once you put the two sides together. I broke a few needles and think I ruined the motor on my sewing machine. The inside was VERY disappointing. I planned all these cute pockets using her dimensions and directions.

  
        She says there are 8 inside pockets. 4 of them are impossible to use unless you are a child reaching inside them. If I make it again, i'll do my own thing on the inside and have lots of pockets that are all big enough to use. I do like that I chose to use canvas for the bag. it's way sturdy and can stand up on it's own. it's a very big bag so I think all in all she'll love it.


   I did a little applique on the pockets and instead of using one large piece of fabric, I used scraps and cut other pieces to make it look way cuter and fit the dimensions still.


  I made a little bag for the inside of this bag to keep medicines and nail clippers and things too. I used a zipper I had on hand and it was metal so it is a bit tempormental.  It may just need to be broken in a little.

the back of the bag has an applique on it also.
 now to sit down and hand sew the binding on and I'm done!!! :) Hope she likes it!