Friday, September 13, 2013

Rapunzel, Rapunzel... let down your hair!

My little princess wanted to be Rapunzel for Halloween, so I Bippidy Boppidy Boo'd up her a dress! The stuff has been sitting there staring at me for a while now, so I decided It just needed to get done!

I used fabric from Moda:

Mimi Drapery Lavender by Chez Moi - Moda Fabric - 1 Yard

 Now I can't find the pink or solid purple fabric anymore, but all were purchased from my favorite fabric store on etsy and here locally in Bear River, Utah: Handmade is Heartmade 


The lace and trim was purchased from Hobby Lobby. 

The pattern I used was from Scientific Seamstress found on etsy: 

Portrait Peasant Tops and Dresses, Boutique Pattern PDF E-Book, by the Scientific Seamstress

For this dress I wanted to add the center princess sections, so I just ... winged it.. again! :) I held it up to her and it looked good, so I went with it. I stitched on some gold ribbon in 3 x's on the center, stitched the sides on and then added some white lace. 

I wanted gold, because I found these shoes and couldn't resist! she will get these for her birthday because all day she is in dress up clothes and dress up shoes. now all she needs is a crown! :) 
They are found here and the color matches perfectly... the pictures don't look like it because I couldn't get the lighting right. 


For the sleeves, I wanted them to look like they had straps, like the old fashioned princess dresses are. So, I cut the regular pattern piece cutting the bottom of the sleeve short by about 1/2 inch.  I then cut 2" Strips of purple, pressed under edges so they now measure about 1" (I wasn't trying to be too exact or anything, but they are all equal). Then I used heat and bond lite to keep them in place while I stitched them down.  Then I added cute ruffle/lace on the edge, pressed the raw seam under, and top stitched down. After that, I zig zaged elastic over top of the top-stitching, while pulling it tight so it would gather. 


This is the bottom hem of the dress. 


The back: 
forgive the strings and wrinkles. She couldn't wait to put it on. and now she won't take it off. A job well done i'd say. :) She approves!!! 

Tuesday, August 27, 2013

Sewing Outfits for Family Pictures

     I am so sorry that it has taken me this long to write a post! My family was focusing our time and energy into finishing out basement, getting our house ready to go on the market, and getting ready to go see my family In Washington! Now after getting home and moving into the basement, my little girl thinks its super fun to push the blue button on the computer which shuts everything down. I rarely get the opportunity to sit here anymore.  JUST SO YOU KNOW, I'M GOING TO BOMBARD YOU WITH PICTURES!! :)


         My friend Jenni Merritt  took our family pictures and they turned out AMAZING!!! I love them!  I went to High School in Friday Harbor, WA and that is where my parents still live today, so when we went back home for a visit, I am happy that we took them on the island. It brings a little extra piece of me and my heart into our home. 


     I have to say that Jenni is such a good person and so genuine. As a photographer, these qualities are a MUST for me, because it made me feel comfortable and it was easy to just be myself.  She made me feel beautiful! On the day of the pictures, I had plenty of time to get us dressed and ready, but my hair was not it's typical self.  I don't know if it was the water, humidity or just a bad hair day (just my luck) but I curled and curled and curled it and it would just fall out.  the same with the girls.  My friend even gave me a lesson on doing straightener curls and I was unable to make it look so nice and effortless like she does.  Needless to say, we showed up late, I was frazzled and my husband was frustrated with me because as usual it became a "bigger deal than it needed to be." I wanted things to be perfect and to have beautiful pictures. I was .... pretty stressed. yikes! After two min with Jenni, I wasn't stressed anymore. :) 

    For pictures I wanted our clothes to coordinate, but not be super matchy matchy. I looked at places like www.sparkleinpink.com and loved what I saw, but it just wasn't us.  the froo froo would be cute, but would be worn once and never again and then I wouldn't know what to have us wear.  I wanted grey, aqua/mint and pink.  One day I found fabric I fell in love with, and like ALWAYS, it was impossible to find.  It is an out of production fabric that I ended up tracking down from three different places.  However the headache was, it turned out perfect and just to my expectations. 

I used these two fabrics below from the Dotties Sweet Shop line (P & B Textiles) and my other fabrics were found from my favorite fabric store on etsy: https://www.etsy.com/shop/handmadeisheartmade 

I'm a little bias, but I think my girls are ADORABLE!!!! for Carli's dress on the left, I used Little Lizard King's dress pattern Brooke. I added a belt around the waist that ties in the back.  I sewed it into the side seam so there was no slipping and adjusting needed.  it turned out perfect. 


for the flower on the waistband, I used small circles and folded them and then machine stitched them down to a fabric circle. I repeated for the middle color and then hand stitched the dark pink in the middle. Similar tutorial found here: http://myblondeambitions.blogspot.com/2010/03/fabric-flower-tutorial.html

Something I did differently here is I stitched a row of velcro down to the waistband and also to the back of the flower so that when washed I could remove it.

I do wish It was a tad bit longer so it would fit her longer and not show her diaper to the world, but I was on a huge time crunch for these and she was taking a nap when i decided i'd cut the length for the dress.  oops.  she can still wear it in the future with pants or jeans though.


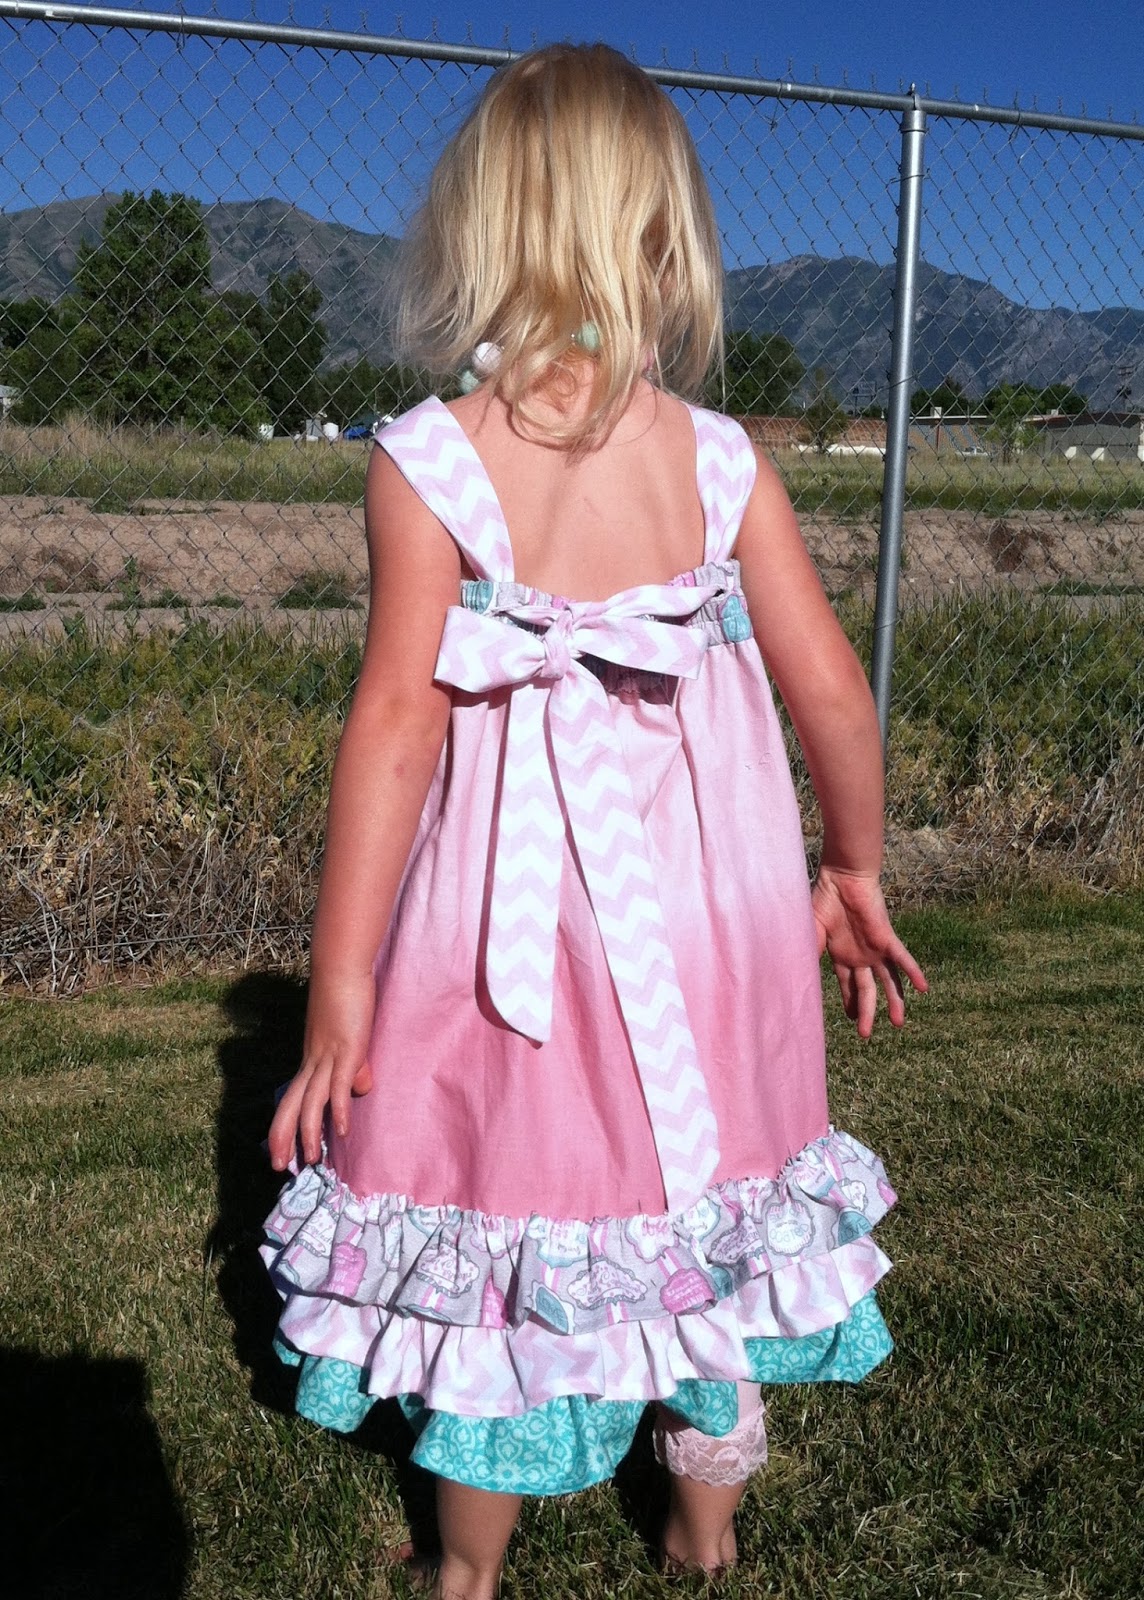
For Keira's dress, I used one of my favorite patterns: https://www.etsy.com/listing/78394035/sewing-pattern-reverse-knot-dress-pdf?ref=related-0

I love the chevron straps and the blue ruffle on the bottom!!! it turned out darling.


don't you just love her nails?! She did! :)


        Now, if you are wondering where I got those PERFECT necklaces, I got KITS for them from BunnyNuts on etsy.  buying made necklaces can cost around $22.00 each and I was NOT going to do that.  This way was totally cake and they love them!!! Cami, owner of BunnyNuts,  is so awesome to work with and is VERY helpful!!! I plan on going back again and again! 

This project was just fun for me!!! I love the result and am happy that my pictures reflect my sewing and how the girls typically dress... even the crazy hair!!! :) 

CAN YOU FEEL THE LOVE?! :) 

I have to tell you, I am not a very fashionable girl.... I would LOVE to be, but I would need a team of experts to take me shopping. Typically i'm a T-shirt and jeans girl.  For pictures though I wanted to feel feminine and fun.  I bought my skirt from 3BrunetttesBoutique  and my necklace I got there too.  

Again, Jenni did amazing especially because she was rolling in the dirt joking with the girls about being stinky like boys! They both were being cranky and you would NEVER know it from the pictures. 

I really loved getting to kiss my husband.  With the short time we get together on a regular basis and needy children, time to just... kiss is few and far between. She almost had to go get a hose to get us to stop. lol!!! 


And my all time favorite picture is right here!!!! 


Children's Art Tote

I kept seeing pictures like this on pintrest and wanted to make one, but as usual, I have my OWN ideas of what it should look like.


I wanted to have a place for stickers, sharpener, colored pencils, crayons AND markers.  I figured I could easily cram it all together and it would still look good.

I also started this project with the intention to make a pattern to show everyone.  I gave up on that half way though, but i'll show it to you anyway.  I love the way it turned out, but I could NEVER EASILY explain how to attach and measure and sew down the pencil pockets and things with skill and technique. It was all just sorta winging it and MAKING it work.

The pad of paper was 9x12 inches


This is what I came up with.  It's not EXACTLY perfect or straight, but it does the job and my daughter loves it!!! :)


TAH DAH!!!!!! 

Ironing board cover

       I am helping to teach a sewing class/club in my church right now and last month we decided to make ironing board covers.  I love mine and they all turned out super cute!!!
 we used this pattern: Patchwork ironing board cover pattern #921


In the pattern it calls for ribbon on the the end of the elastic you string through the whole casing.  I chose to not do that step and just keep my elastic extra long.  I just tied it in a bow and tucked in up under. it works great!!! Plus, if my kids see something dangling down... it just begs to be pulled on!


These are the covers others in the class did:


  I am so glad Breisha knows how to teach! She is so good at what she does!!! It's so fun to help! 


Carli's 1st Birthday

       My baby just turned 1 and I thought it would be  a cute theme to do Milk and Cookies. :) She loves Milk and she of course LOVES cookies!!!! I wanted to do just a low key backyard party for her with neighbors and family over to eat cookies and drink milk and play on the trampoline and in the kiddie pool. It was a success!!!

      I had to wake her up from her nap for her party, so she took a little while to warm up.

I saw all these cute pictures of milk online in cute bottles but couldn't find them and didn't want to pay that much for milk.  This works! :) My friend made up the cool labels and decorations for me.  I just printed them off and hung everything up.


         I even went with the milk mustache idea and made a bunch of chocolate mustache suckers.

         For my oldest daughter's first birthday she got a Stella doll and my old doll cradle my dad made for me when I was a little girl.  I sewed some cradle bedding and a baby blanket for her.  For Carli, I wanted to carry on the tradition. I saw this cute crib from Ana White with instructions online and knew this was the one. My good friend Arnold helped me build it and we made it even better than the crib in the instructions with his craftsman know how and awesome tools!!! I learned so much and I can't wait for another project!

I should have taken before pictures of it, but didn't.  I ended up painting it white with a coral drawer.  I even sprinkled glitter on the drawer for a sparkle look! :)

( I can't get the picture to load on here normal no matter what I do... sorry) I promised Arnold that I would write my name on it somewhere, so I did that and wrote her a little love note on the bottom of the drawer.


I am in love with this fabric, and my friend let me dig through her fun fabric stash so I could make something for her.  This turned out perfect!!!
I wanted the bedding to resemble real baby bedding, so the bumper was very important and not hard at all. 


         It would have been fun to make a really cute blanket for the baby using a fun quilting pattern or something, but I was ready to just be done at this point and already feeling guilty for all the extra work I put into this gift. 

What's in there Carli? Only the most coolest, specialist gift ever!!! U better love it!! :) lol


  I think she likes it!!!! 

                                                               
    For Her birthday cake I just used cake mix from a box and did pink and chocolate, and layered them and put a big scoop of icecream in the middle. :) (that's a mustache on top)


It was a super fun day and all the kids... and adults had a huge sugar overload!!! :) I still can't believe my baby is so grown up. It seems like just yesterday I brought her home for the first time.