Tuesday, February 28, 2012

Nursing Pads


I saw this fabric and thought it would make cute nursing pads! :)

I used 4 layers of flannel and zig zagged around the edge.  I hope they work well! I won't know for a few more months. I ran out of white thread on the last one... oops.

I traced 4" circles with crayon and cut each one out carefully. I used our cheerios treat holder for diaper bags that I had. (the kind you find in the grocery store for cheap)


Recovering my carseat


         When I went into the basement to check out the baby stuff after I found out I was having another girl, the carseat made me cringe. The underside of the lining was all beat up and melted and the top just was not cute. A long LONG time ago I bought the tutorial pattern from this etsy shop: http://www.etsy.com/shop/GeorgiaLeighDesigns?ref=seller_info with the intention to redo it when keira was using it.  I was terrified to try so I decided to do it now. My husband didn't even understand my fear of doing this and he could care less about this kind of thing. I am not a pro at sewing and i'm not AMAZING as everyone keeps saying.  The only thing that makes me impressive to others is the fact that I try stuff and with each try I get better and better. All they see is the end product. I guess I'm just super determined or something!

    All I got from the tutorial I purchased was basically take a seam ripper to it, take pictures of it as you go so you know how it goes back together and trace the pieces you took apart to make new pieces. if I would have known that, I would not have bought the pattern.  THEN I found this FREE tutorial online: http://www.makeit-loveit.com/2011/02/recovering-baby-car-seat.html  SIGH.

      My seat is a very simple, basic one that isn't very tailored or forgiving if it isn't PERFECT like the one it came with. I was afraid of that.  I wanted a seperate part up the middle, shown in black minke, so I cut it and added 1/4" to the cut edges of the new pieces to make it fit.
     This new one is not a very snug fit which I'm disapointed with, but it's still better than the last one.  I might figure out some sort of velcro to attatch it to the seat better. The back is not pretty and I probably should have used just plain black cotton to line it with because I had to replace the batting.  You don't want to leave batting exposed.  Instead I used pink fuzzy material I already had on hand.  it made it more poofy and bulky.  also, at the top of the seat lining are pleats that I didn't made big enough and I tried to fix after the binding was already on.  As long as you don't look underneath, it's an ok seat cover! :)


THE CANOPY

       The canopy was more intimidating to do than It should have been.  It was the most fun to do! most come from the store without an under side, so I did one for this. 


my favorite part is the ruffles I did!!! :) I can't wait to put my baby in it! now to make strap covers and a head rest.


Sewing more for the diaper Bag


This is a changing pad I made, a wet bag I bought and a pouch I improved.

    I have a few different changing pads that I've used in the past but have not liked any of them. They all were plastic and when you'd put a new baby on them it was cold and they screamed! Plus, if they wet which they often do, the pee runs off the changing pad onto your bed or the floor and soaks them in the process. kinda pointless in my opinion.  I found this pattern online: http://www.etsy.com/listing/91296386/pdf-ebook-baby-changing-mat-little-buns   but decided to use this free pattern instead: http://cookieandclaire.blogspot.com/2011/02/diaper-changing-pad-tutorial.html 

          My changing pad turned out pretty nice, except it's ultra thick. I added a layer of all cotton batting that was super thin thinking it wouldn't really make a difference and I swear someone used it in their changing pads they sell online.  Now when I roll it up in the bag it takes up a lot of room.  oh well! it's cute and comfy! :)

          The wet bag I bought online and am so glad I did. With my first daughter I had no such thing and I remember the blowouts and the smelly clothes that she constantly threw up on. The acid reflux problem was gross!!! Anyway, the clothes just ended up getting thrown in my bag getting everything stinky.  This wet bag was bought here: http://www.etsy.com/shop/JodysDesigns?ref=seller_info   She's awesome to work with and even sold me her left over fabric to make the chaning pad with. Why didn't I sew one myself you ask? well, I've never worked with waterproof material like is used in this bag and I'd have to buy a lot of the material to make one little bag. in my mind at the time, it wasn't worth it.

         The pouch was also purchased from:   http://www.etsy.com/shop/PillowSewCute    again, at the time it made sense to buy this bag because I didn't want to buy a whole bunch of fabric to make it. However when I recieved it I was totally disappointed! There was no interfacing used, nothing to sturdy the bag at all. The plastic is really thick and it was just an awkward bag.  I ended up taking it apart, adding interfacing and adding binding along the top of the plastic. I felt like I made a stupid choice in purchasing this bag and could have done a way better job myself. again, oh well. Lesson learned.


       I also bought cute yellow flannel and white flannel to make a blanket for our new girl. All of the blankets used on my first daughter are old and not soft anymore.  Because of her acid reflux, we washed blankets A LOT! I now need to make a bunch more, or just buy some cheap ones from walmart! :)


Thursday, February 16, 2012

Diaper Bag for Our new little girl


     This pattern is from the previous post I made "diaper bag for Mary" where I was disappointed in the pattern and wanted to make some changes. I figured out how to change the pockets inside to be big enough on the ends to actually use and I added a zippered pocket on the outside to keep my chapstick, lotion etc handy. 
               I found a tutorial online that helped me figure out how to do it: http://u-handbag.typepad.com/uhandblog/2007/02/zippered_inner_.html

It's a pocket INSIDE a pocket!!

   For this bag I used canvas on the oustide as well and for the inside I used "Bundle of Jungle" print by Marcus Brothers. 
     It has a zippered top and binding along the top that my poor fingers are cursing me for doing.  There are also 6 pockets on the outside .. plus the zippered one, and 6 pockets on the inside.  Now I need to make some things like a changing pad and wet bag. :)


This was an old jjcole binki holder that I took apart and TRIED to make it with my fabric. It worked, but it's not the best sewing job ever.


I also made some pacifier clips really quick. :)

It's good to get one thing on my list of many things to sew done! 

Thursday, January 26, 2012

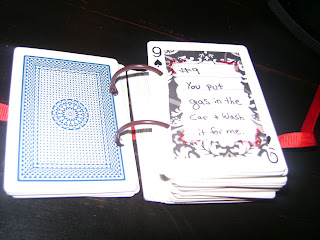
52 Reasons I LOVE You


I found this post on etsy on how to make a valentine gift for someone you love out of a deck of cards


      I am thinking of things I can put in a box and mail to my husband on Valentines day to make him smile because he'll be away at work. I'm not BIG into Valentines day because it's just a money making holiday and doesn't really mean much to me, but I figured it would be fun to do for him.

It turned out to be so thick that I have to tie a ribbon around it to get it to be somewhat flat! :) My cards don't look as good as the tutorial ones, but they'll work.


      The cards I used were just some old ones we HOPEFULLY won't miss. we have a few decks. They are blue and don't go with the colors I picked to do this with, oh well! :) I also made sure to do red glitter glue on each and every page in some way or another to tie it together. I used 4 different styles of papers.


I love my husband so much, I never imagined it would be so hard to find 52 worth while things to write down. It wasn't hard just ... head scratching.

I did a back for mine too. Hope he Likes it!


Friday, January 6, 2012

making a replacement seat for a doll stroller

      We bought a doll stroller from walmart for $10.00 or so for my daughter's birthday in October. in 2 months she managed to rip the fabric on it because she likes to sit in it herself. No surprise it broke! :) We figured it would happen sooner or later and it was only $10.00 so no big! Today, after weeks of her wanting me to fix it, I finally did. :) it took me about an hour start to finish and was pretty simple.
     I used a small piece of scrap for the whole thing that I bought at walmart for cheap months ago.  I lined the front parts of it with fusible fleece to add support in case she still wants to sit in it. :)  I cut the old one apart and traced it onto the new fabric and went from there.  I hated how the bottom of the seat would always come off and she would bring it to me multiple times a day to put it back on for her, so.... I added ties to keep it on this time.
    It's not the best sewing job i've ever done, but it works. I used what I had on hand and hurried up with it. I'm not concerned with tiny cosmetics on this one.


                                                         This makes for a happy girl again!

Diaper Bag for Mary


               My best friend is having a baby in a matter of weeks!  months and months ago, I promised I'd sew her a diaper bag, so as usual, I crammed a week of sewing time into a day and a half.  This pattern I used looks cute on the outside, but if I ever use it again, i'd change A LOT about it. http://www.etsy.com/listing/64227052/ultimate-diaper-bag-pattern-tutorial
First of all, the instructions are very spotty. There was a lot not spelled out that you are left to figure out on your own. I was annoyed with that because it took me longer to do, but other than that I had no problem figuring it out. The straps were super thick to sew through once you put the two sides together. I broke a few needles and think I ruined the motor on my sewing machine. The inside was VERY disappointing. I planned all these cute pockets using her dimensions and directions.

  
        She says there are 8 inside pockets. 4 of them are impossible to use unless you are a child reaching inside them. If I make it again, i'll do my own thing on the inside and have lots of pockets that are all big enough to use. I do like that I chose to use canvas for the bag. it's way sturdy and can stand up on it's own. it's a very big bag so I think all in all she'll love it.


   I did a little applique on the pockets and instead of using one large piece of fabric, I used scraps and cut other pieces to make it look way cuter and fit the dimensions still.


  I made a little bag for the inside of this bag to keep medicines and nail clippers and things too. I used a zipper I had on hand and it was metal so it is a bit tempormental.  It may just need to be broken in a little.

the back of the bag has an applique on it also.
 now to sit down and hand sew the binding on and I'm done!!! :) Hope she likes it!


Monday, December 19, 2011

Cookies for the Holidays!

       Ok, so i've been super lazy for the past few months! sorry!!! I have a good excuse though!
        Welcome Baby #2 to the family! :) I've been tired and sick for months and this last week I spent time making cookies. it's the first time I've had a desire to do anything in a LONG time.

Sugar cookies I had fun decorating. If only I liked to eat them!!! My daugher won't eat them because there is frosting on them and she doesn't like to get dirty. :)


  This is a recipe I got from my sister in law and they are soooo good! I was baking them with my daughter and counting how many cups of flour i was putting in the bowl. I sorta lost count and believe there is a cup missing. They turned out more flat than hers, but still taste awesome and are soft and moist. MMMMM..  There are milk choc chips in them and semi sweet chips AND white choc chips too!


These are my husband's FAVORITE cookies! Peanut butter cup cookies using a mini mufin tin. I got the recipe from Allrecipies.com http://allrecipes.com/recipe/peanut-butter-cup-cookies/detail.aspx   they are more moist than the back of the bag recipe.


I also made ginger cookies that are like ginger snaps only a soft version I found on pintrest. I NOW can't upload a picture of it because the file is messed up and i deleted it. anyway, they are awesome! I can't find the recipe either. I'm sorry.

Thursday, October 27, 2011

Cutest Christmas Dress EVER!

         I, AGAIN, saw this outfit for sale on etsy for $60.00 plus shipping. I REALLY toyed with the idea of layawaying it and paying little over time for it becaue I couldn't find the fabric anywhere and I wasn't feeling very motivated at the time to sew it. I COULDN'T let myself spend that much on an outfit, and I know my husband would have not appreciated it much at all. What I decided to do was look on etsy for outfits being sold with this fabric and ask if they had extra they would be willing to sell. because it was last years print and hard to find, many people were not happy to share. LUCKILY I found two different people who were excelent to work with ! THANK YOU! I loved the design of this dress and the way the fabric was used. I WISH I could come up with cute things on my own like this. When it comes to fabric selection and putting different ones together I feel helpless.
   
http://www.etsy.com/listing/83241757/girls-dress-pattern-stripwork-jumper-pdf I purchased this pattern off of etsy and I was confident it would work for me. Scientific Seamstrisses patterns always work awesome! I love her patterns!  This pattern called for a ruffle on the bottom, but I wanted just a flat one, so I folded the fabric in half and zig zaged it together then sewed in on and topstitched. :) It worked perfect! :) I only used EVERY inch of the check fabric I had so in a few places I had to piece it together to make it long enough. Hopefully you can't tell. :)
         I had some jeans that were too small for her that I added a ruffle to for pants. She can wear tights to church. (I made the dress long enough to do that with)
       I absolutly love the bodice of this dress. It's a slip over the top version with no buttons or snaps to worry about and it uses a lining, underlining and front piece to it. PLUS interfacing for the button hole. I LOVE it. It's thick and yet flexible and soft and won't need ironing I'm hoping.

        The bodice is gathered to the skirt and it adds such a cute twirly feel. All that is missing here is the buttons. I am waiting for some red swirly mint buttons to come in the mail. :) There are bows on the way too. I can sew like crazy but to make cute bows is another thing I can't quite figure out.
          Last night I cut out keira's dress and then cut out and sewed two doll dresses for Her babies that look the same with my left over scraps. She loves them! This morning I sewed together her dress and pants in just a few hours.

I sure love my model! she loves the camera!