Thursday, July 5, 2012

Carseat Canopy


        There is something wrong with me. seriously. I wanted to get this sewn before I had Carli, so I started and finished this Thursday and I had her Friday. I'm nuts!

       The zebra print is a bit much, but it was cheap at walmart and I only a little left of the animal print after doing the carseat recovering and diaper bag. I had black fabric that was pretty much free that I purchased from a garage sale last summer. I used that for the inside.


I purchased this AWESOME pattern from:

It is worth every penny! I'll tell you why!


 The canopy is extra long in the front and back and sides. The last one I had barely covered her feet in the front and it was always flying up in the wind. 
The back also has this awesome bustle that you can snap up and let the baby get some air without exposing her to sun and stuff. I'm still overwhelmed by zebra print. I really wish I would have gone with something not so loud.

The front has a zipper that you can open to see her, or give her some air and still block the sun while still allowing you to use the handle to cary her. I love the girly ruffle detail or you can do a less girly piping detail.
Inside there are 2 convenient toy loops that I always wished others had. They are placed right below the straps used to attatch the cover to the carseat.

            All these combined make for a very user friendly and cute canopy that baby can sleep comfortably under.


           While making this, I was so rushed that I didn't take my time to read instructions carefully and am used to patterns with a ton of step by step pictures. This pattern is a lot more like the patterns you purchase in the store. If I would have slowed down I would not have gotten frustrated during the zipper/front and back assembly process. AND I should know better than to cut the zipper short before the thing is done. SO DUMB!!!! that lead to a lot of safety pinning and taping to make sure it stayed the way it was supposed to before completion. I ended up adding a lot more time than needed and using my seam ripper way more than I like to just because I hurried. ANYWAY, it turned out fine and works! again, not perfect, but nothing of mine ever is. :)


Baby #2- Carli

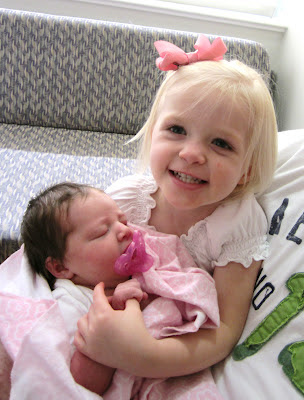
     I have to say, this is my favorite picture!! I was so full of joy and holding back the tears! What a memorable moment for me!! With my first birth, my daughter had to be taken to a different room right away and my husband left to be with her. This time it was not rushed, I wasn't strapped down and could hold her, I got to see her be cleaned up and monitored and weighed right next to me. My husband got to hold my hand and be there with me the whole time!!!

    Carli weighed 8lbs 11oz and was 20 1/2" long. I still can't believe such a huge baby fit inside me! No wonder I was so miserable and could barely walk!
She has chubby cheeks and since she has been home, has thinned out everywhere but her face! I love it! She looks a lot like her big sister did only different in her own way too. I make beautiful girls!!! I couldn't be more proud!
wearing the outfits I made for them in the hospital!
going home in the carseat I made!

The first of our professional pictures! more to come!

Happy 4th of July!!!


Wednesday, June 20, 2012

Tutu dresses for pictures


My friend, Kate made the tops of the dresses for me and I tied tulle to them. Turned out pretty cute!
She makes crochet patterns and sells them here: http://www.craftsy.com/user/pattern/store/17685

She does awesome work!
I'm making these to have the girls wear for our family pictures in a week.

The one on the right is for our newborn.
I might change the position of the bow on this one. I couldn't decide and it's hard for me to place it without a baby in it.
Keira dances around like a ballerina princess in it! :) I can't keep it off her.


I made diaper covers for both dresses
and the end result is plenty of summersaults!


Friday, June 15, 2012

Sisters outfit

What am I still doing awake?! I should totally be sleeping because it's 1:30 a.m.
It's the only time I get to have to myself lately, although i'm usually so beat tired I can't keep my eyes open. Where is this energy coming from? I am a week away from my due date and feeling like I have things left to do that somehow have been forgotten about. I FINALLY packed a hospital bag yesterday.

            I bought fabric at Joann's pretty cheap with my coupons the other day and wanted to make some sister outfits to POSSIBLY wear at the hospital. we'll see. I was hoping to give me a project that would take up some time and make me forget about the week ahead. I can't just leave stuff for later so I started the skirts this morning and finished it all tonight. All day I was out and about so I'm pretty amazed!

            The applique on the shirts didn't turn out as good as I hoped for. ESPECIALLY the onesie! that was horrible because it was so small. don't look too close because you will think it looks as bad as I do. I just don't have the right stitches on my machine for these and it would have been a perfect project for an embroidery machine. SOMEDAY!

I might make a diaper cover for my 2 year old to go under the skirt. we'll see how I feel tomorrow. :)

           oh, for the letters, I just went into microsoft works and picked a font and printed it the size that would work well. it was at size 74 and then I printed it at different sizes like 180% or something. you just have to play around with it. Then, I held it up to a window backwords and traced it onto the paper side of the heat and bond sheet. after that, I cut each letter out rough and ironed it on to different fabrics then cut the letters out. worked great!

Thursday, May 24, 2012

more nesting


I keep thinking about the last time I used the bassinet and how much I was frustrated that everything I needed was in different places. Her lotion was in her room, diapers and wipes were in a jjcole box thing on the floor, burp rags were in her room and the changing pad was useless. Because we don't have a nursery set up for her yet (basement still being built) I wanted everything to be accessable when I needed it.

I saw this on etsy for sale and had a light bulb go off! http://www.etsy.com/listing/93623395/giraffe-stripe-and-dot-custom-diaper   Keep in mind that hers is way stinking cute and the fabrics are adorable. I was trying to make this without spending a penny. I used scraps of fabric I had left over. I didn't even have any more fusible fleece, so I used blanket batting and some of those plastic children's placemats. I cut the placemats to the dimensions I wanted and sewed all around them so they couldn't slip around. It adds some stability that otherwise would have been there if I used the right materials in the first place. I lot more work than was needed, but that's just how I roll these days.


so mine doesn't look the prettiest, but it's functional like I wanted.


I even made a new sheet for her to match. If you can't tell in the picture, there is yellow and green in the fabrics used. If I was feeling really ambitious and wanted to spend the money, I would have recovered the whole bassinet too, but I didn't. I am really tired these days, grouchy, and want her out NOW!


to secure it to the side of the bed it's self, I used some clip things that were already being used for something useless on the bassinet. This helped so I didn't have to make button holes in the bedding to fit. Also, if I decide to keep the bassinet in a different spot than I planned, it's a piece of cake to move it to the other side or something.


I also made some newborn size bibs today. I want to be done sewing so badly but have one more thing I might do. Other than that... I need a break. sigh.
For the bibs, I just traced a bib I already had, added 1/4" seam allowance around it and used that for a pattern.

Monday, May 21, 2012

Camera Case

      For my Birthday (I've been 23 for a few years now-I REFUSE to turn 30...ever) my husband bought me a new camera because my last one got ruined by a certain little girl and was having issues anyway. I got a Canon PowerShot ELPH 100 HS and so far I love it! It needed a case, so I saw this tutorial today and decided to make it. http://sew-mad.blogspot.com/2008/02/triple-c.html  hers is way cute because it's pink!!! I decided to go with something more boring and use fabric I already had.... AGAIN!

      These pictures are from my phone, so they aren't very good. I used black minky on the inside, two layers of cotton pure and natural batting for the middle and I used iron on interfacing for the outside layer. I followed her instructions including measuring instructions. It was intimidating to HAVE to measure, especially because lately i'm feeling ultra lazy. Once I got the pattern piece figured out, it was a piece of cake.


Scripture Cover

         I wanted a scripture cover for my beat up scriptures. Mainly to keep my daugher from wrinkling more pages. This was a first try and needs some adjusting before I post a pattern for it. I did take pictures of each step and plan on doing something more with this. These are the full size quad scriptures. I found a tutorial with a pattern for the mini ones on pintrest, but had to make up my own thing for this size.


       It has a two slot pencil/pen/highlighter pocket on the inside.
 

sporting my pen my dad helped me make! :)


If you notice, earlier this does not have a stripe on the outside. I took it apart this morning and added it to the outside and I fixed the spacing issue on the inside. I think I'm ready for a pattern!!! :)


Thursday, May 10, 2012

Apple of My Eye Minky Blanket

           This fabric was recieved in the mail today and I couldn't help but want to use it NOW! :) I washed it and dried it and have been doing nothing since. My house is a mess and SHOULD be cleaning, but who wants to clean when you can create something?! I purchased the fabric from http://www.etsy.com/shop/BaileyGirlsFabric?ref=seller_info She is wonderful to work with and the fabric exceded my expectations! The quality of the minky is definitly better than any i've ever purchased from joanns. yes, you pay a little bit more, but it's worth it!!!!!


          I used a few tutorials SORTOF. Which means, I read them over and just go off on my own. http://www.mamastellato.com/2010/05/simple-baby-blanket-tutorial.html  This tutorial and blog are excelent!

             I am new to working with minky, and boy do I know it. It's stretchy and lets just say this blanket didn't turn out perfect. none of my stuff ever is, that's the fun in it! :) I used pure and natural batting in the middle of cotton and minky so it added some thickness and warmth. because it wasn't exactly lined up perfect, there was some twisting and bagging in the two layers. I made it a bigger blanket too (45" square) so the blanket probably needed to be tied or something anyway. I ended up machine stitching around the striped apples. It took me all day I think.  In the end, it turned out just great!

  This is a HORRIBLE fold job, but my camera was acting up so I can't get another picture. I LOVE all the pretty bright colors!! :) I can't wait to snuggle my baby in it!!!


Wednesday, May 9, 2012

EASY Hooded Towel Tutorial

Again, I apologize for the terrible pictres. I'm using an old camera until I can afford a new one. This little stink bug broke my last one. Also, forgive the mess. I'm in the process of moving baby stuff in and sewing stuff out of this room. Big job!


Materials needed:
bath towel
hand towel
thread
sewing machine

Step 1: fold hand towel in half like a hamburger bun. place it on your child's head and see how far you want it to cover their face or come past their forehead. I didn't do this the first time and had to make some adjustments. My daughter is almost 3 and she still has room to grow with this one. I ended up cutting 6 inches off the side.

Step 2: with right sides together (meaning on a towel... the finished edging you want showing outside is the right side)  stitch up cut edge at 1/4 inch and then either serge or zig zag the edges.
After I bought these I realized one side would be different than the other side of the hood. oh well! they were cheap! (on the pink towel I also cut about an inch off the bottom just because I didn't want it super long. not necessary.

Step 3: find the center of the main towel by folding in half and placing a pin. Match up center of main towel to seam on hood. With right sides of hood and main towel together, stitch at 1/4 inch.
ALL DONE!